mp3DirectCut
User Manual
Table of contents
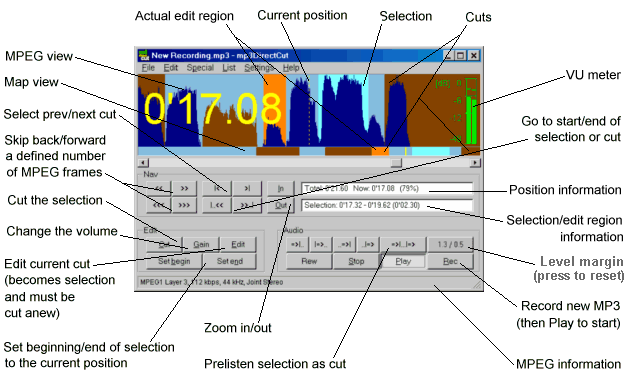
Quick reference
What is mp3DirectCut?
Basic settings
Navigation
Audio editing
Prelisten and Output
Recording
Project files
Keyboard shortcuts
Command line parameters
Quick reference
What is mp3DirectCut?
mp3DirectCut is a frame based editor for MPEG audio. You can set ranges for cutting or changing the volume like in common audio editors. At all operations the file will not be re-encoded. This saves time and disk space and prevents loss of audio quality. You can easily navigate through even large files and mp3DirectCut gives you a visualisation of the MP3 audio data.
Basic settings
The program needs either an installed MP3 ACM Codec or the 'mpglib.dll' to decode MP3 for playback. The mpglib.dll with the complete source is available at mp3DirectCut's homepage. It decodes Layers 2 and 3. The mpglib.dll makes the editor more independent (if you don't have an ACM) and supports Layer 2. But it takes a bit more cpu than ACM.
In the Play settings you can also select a Wave device and adjust the amount of frames to be decoded to each play buffer between 'fast' (1 frame) and 'reliable' (8 frames). On slower machines set a higher value. If you want to have a fast response of the graphics select a faster value.
Navigation
As mp3DirectCut is designed to handle large files, there are many ways to reach a position:
Scrollbar
With the slider you can move along a file.
The arrow buttons (or keys: Shift+Left/Right) move a single
MPEG frame back or forward.
The page up/down areas skip the file by +/- 5 seconds.
[<<<] [<<] [>>] [>>>]
(or keys: Left/Right and Page up/down)
These buttons are user definable.
You can set the amount of frames to skip back/forward
in the configuration window between 10 and 10.000 for
[<<<] and [>>>] and between 1 and 1.000 for [<<] [>>].
Mouse
You can directly jump to any file position by left clicking
into the map area below the audio graph.
And: if you hold down the CTRL key and click into the
audio graph the cursor jumps to the shown audio position.
[I...<<] [>>...I]
These buttons set the play cursor
to the selection's beginning or end. If there is no selection
the position is set to the active range (cut, gain, cue).
Edit Menu and [I<] [>I]
Lets you choose the active range and sets the play cursor
to it's beginning.
Position field
You can enter a position by time or percentage into
the edit field and apply the value by pressing Enter or Tab.
Some words about visualisation of MP3: the audio graph takes volume information directly from the MP3 frames and differs from the real decoded audio amplitude. Even the height which the frame bars can reach varies by different MP3 types. The graph is for orientation and searching positions only. For a more reliable audio level info use the VU meter on the right.
Some words about visualisation of MP2: it's of statistical style and contains limited audio information.
Audio editing
- Method 1: Left button sets the beginning of the selection (by clicking or dragging), the right button sets the end.
- Method 2: Left button makes a new selection and enlarges it. The right button moves beginning or end (depending on which is nearer).
- Normal cut - contains data to be removed
- Gain area - volume changes or fadings
- Cue - a cut with the length of 0
1. To edit a part of your file you must first make or change a Selection using one of these ways:
Buttons [Set begin] and [Set end]
These buttons will set the beginning or the end of the
selection to the current position.
Mouse
You can drag a selection by using the left and the right mouse button.
How the buttons behave can be set in the preferences:
Selection field
You can enter beginning, end or length of the selection
by numbers. Take care not to delete the symbols, otherwise
the values cannot be read from the field correctly.
2. With your selection you can set one of three types of ranges:
Cuts and Cues
To make a normal cut mark a
selection and press [Cut]. If the selection has a length
of 0 it will become a cue. Cues do not modify the audio,
they can be used to locate positions and must be used
for creating a cue sheet (see under Project files).
NOTE: Cuts do not disappear like in common audio editors. You will see them with a different background color.
Gain areas
The [Gain] button opens a dialog which lets you modify
the volume of the selection. 'from .. dB' sets the initial volume
change, 'to .. dB' the final. So the range can be faded in any
direction or constantly be changed.
Volume areas are shown with the same background color but different color of audio data. Note: Volume change works only with Layer 3. As the data remains encoded volume changes can only be made in a resolution of 1.5 dB steps.
A gain area can also be created by the Normalize function in the Edit menu.
3. Change or remove existing ranges
First set it the "active range" (highlighted). The easist way is by using the "Autoselect" option (enabled by default). Alternatively you can highlight an area as described in the Navigation section. Then press [Edit]. The range will become the selection and will be deleted (!). So after changing boundaries or fade values you must hit [Cut] or [Gain] again.
Limitations
The maximum number of different edit ranges is 200.
Cuts and gain regions cannot overlap each others. If you
cut a selection which covers other cuts they will all
be merged (be careful with gains, they will be
converted to cuts!). If you try to set a gain region which covers
other cuts nothing will be merged but the gain region will be shortened.
Prelisten and output
Normal play ist already a prelisten mode because every cut and every gain modification is played as it will be saved. In addition there are some buttons to prelisten the selection boundaries before cutting:
[=>I..] / F5 - play 2 seconds to the selection beginning
[I=>..] / F6 - play 2 seconds from the selection beginning
[..=>I] / F7 - play 2 seconds to the selection end
[..I=>] / F8 - play 2 seconds from the selection end
[=>I...I=>] / F9 - play the selection as cut (2 secs before and after)
After finishing prelisten the cursor returns to the previous position.
A created file can either be the whole data outside the cuts ('Save...') or you can save only the selection ('Save selection...'). You can also save multiple pieces at once: 'Split file...' creates seperate files for every region between cuts or cues. Note: You should always check the output file(s) before deleting the original.
For compiling files in any arrangement use 'Append selection...'. Your selection will be appended to the choosen file. But do not to combine different formats. Type, mpeg version, layer, bitrate, samplerate... must match. The program does NOT check this.
Recording
For recording an MP3 directly to disk you need either an ACM Codec or the Lame Encoder DLL (available through the homepage of the Lame project). It is important to choose a base filename. Your recordings will be saved under this name. Note that there will be no query for overwriting existing files! If you select 'Add date & time' each recorded file will have date and time in its filename.
To initialize recording press [Rec]. Then you can adjust the audio level using the VU meter. After pressing [Play] the file starts being written. With selected 'Append data' in the recording settings an existing file will not be deleted and you can make multiple recordings to one file. But take care not to use different bitrates or samplerates in one file.
While recording you can set up to 40 cues by pressing [Set begin]. The number and position of the last cue is shown in the range area.
The value of 'Buffer' shows how much data is waiting to be encoded by the codec. If it grows the codec is not fast enough to encode MP3 in realtime. The unencoded buffer portion should not be over 10% for more than some seconds. On modern systems it should be always 0%.
If you launch mp3DirectCut with '/r' in the command line it will start the recording immediately with the encoding settings of your last session. You can use this option for automated recordings. See more under Command line options.
Project files and Cue Sheets
An mp3DirectCut project file (*.mpd) contains the name of the audio file and all cuts, gain areas and cues. If you work with large files and make a lot of cuts you should frequently save your work to a project file.
Cue Sheets (*.cue) contain a link to the audio file and cues (cuts with a length of 0). Cuts and gain settings will not be saved. When loading a Cue sheet the program reads title and artist names and shows them in the graph area. If you split a file using a Cue sheet you can create filenames with titles.
Keyboard shortcuts
| Space | Play/Stop |
| Page up/down | Move back/forward defineable large step (<<< / >>>) |
| Arrow left/right | Move back/forward defineable small step (<< / >>) |
| Arrow up/down | Jump to beginning/end of selection or actual range |
| Ctrl+Left/Right | Jump to previous/next range (cue/cut/gain) |
| Shift+Left/Right | Move one frame backwards/forward |
| Delete | Cut |
| Home | Jump to file beginning |
| End | Jump to file end |
| Ctrl+P | Enter position field |
| Ctrl+L | Enter selection field |
| Ctrl+O | Open file |
| Ctrl+S | Save Project or Cue sheet |
| Ctrl+F4 | Close file |
| F5...F9 | Prelisten modes |
| Backspace | Margin reset |
Command line parameters
Files and Projects
Every file type known by mp3DirectCut (MP3, MP2, project
files, cue sheets) can be loaded via the command line or
Drag&Drop. If you add mp3DirectCut to these file types
you can open them directly from the Explorer.
Auto record
'/r' starts the recording immediately. Use this feature for timer
recordings. In Window's scheduler you can also set a duration
time after which the program will be terminated. For multiple
timer recordings be sure to check 'Add date and time' or
'Append data' in the recording settings, otherwise previous
recordings will be overwritten.
Copyright (c) 2000-2003 Martin Pesch